NodeRun is the newest Profound Logic product dedicated to making it easier for Node.js developers to create applications by moving development to a cloud-based environment. NodeRun comes with a full IDE with Visual Designer, editor, debugger, and Node.js already pre-installed. Some of NodeRun's most notable capabilities include design screens, the ability to develop and run application within the program, full debugging capabilities, the ability to install NPM packages, manage your own Node.js server, work with active sessions to see end-user activity, host database and built-in Database Explorer, a command-line terminal for full control of your space, as well as the ability to share and collaborate with other developers.
Getting started with NodeRun is quick and easy. All you need is a modern internet browser (Google Chrome, Mozilla Firefox, etc.) and that's it. Every NodeRun Space is free to build and comes with its own files, database, and server. To get started visit NodeRun.com create an account and begin developing, it's that easy!
This 8 part blog series will give you a set of exercises to help you build a Node.js applications that work with employee data. Last week we looked at how to list a web service within NodeRun, this week we are going to learn how to create a details web service.
Exercise 8 - Details Web Service
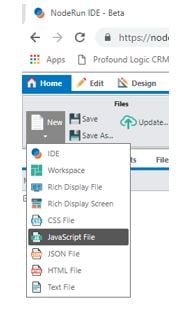
Within the IDE Visual Designer, select the New tab and select JavaScript File.
After starting a new JavaScript file enter the code below and save as get_employees.js.
Code Explained
- request.params allows you to access parameters passed as part of the URL
- Other types of request parameters can be accessed as well
- request.query gives you query string parameters
- request.body gives you POST data parameters
- records.length specifies how many record were retrieved; if 0, we send a
{ success: false }response
Create Web Service Out of get_employee.js
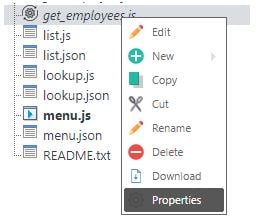
On the right hand menu right click the saved file under Files and select Properties:
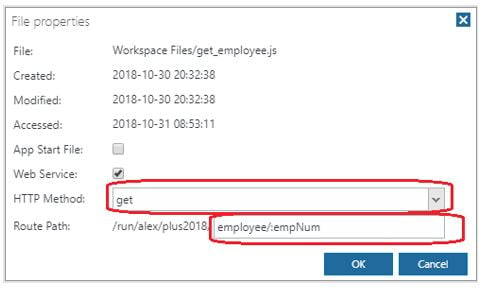
Then select the following:
- Web Service
- HTTP Method: get
- Route Path: employee/:empNum
Test Details Web Service
Select the Launch button and select Launch App in Browser Tab. In the new tab, select the Test Details Web Service button.
You can also try modifying the employee number within the URL ( as seen in the image above).
In our next post, we will get discuss Consuming a Listing Web Service using NodeRun.
If you missed out on any of our previous Guided Labs here is a recap of those exercises:
- Guided Lab: Employee Data Application Part 1 showed you how to build your employee lookup application from scratch.
- Guided Lab: Employee Data Application Part 2 showed you how to use the database-driven auto-complete option and how to add a dynamic image to your display.
- Guided Lab: Employee Data Application Part 3 showed you how to create an employee listing application with a grid of your employee's records.
- Guided Lab: Employee Data Application Part 4 showed you how to enhance an employee records grid and how to add the capability to review record data within that grid.
- Guided Lab: Employee Data Application Part 5 showed you how to list a web service within NodeRun.


