NodeRun is the newest Profound Logic product dedicated to making it easier for Node.js developers to create applications by moving development to a cloud-based environment. NodeRun comes with a full IDE with Visual Designer, editor, debugger, and Node.js already pre-installed. Some of NodeRun's most notable capabilities include design screens, the ability to develop and run application within the program, full debugging capabilities, the ability to install NPM packages, manage your own Node.js server, work with active sessions to see end-user activity, host database and built-in Database Explorer, a command-line terminal for full control of your space, as well as the ability to share and collaborate with other developers.
Getting started with NodeRun is quick and easy. All you need is a modern internet browser (Google Chrome, Mozilla Firefox, etc.) and that's it. Every NodeRun Space is free to build and comes with its own files, database, and server. To get started visit NodeRun.com create an account and begin developing, it's that easy!
This 8 part blog series will give you a series of exercises to help you build a Node.js applications that work with employee data. This next 2 exercises will show you how use the database-driven auto-complete option and how to add a dynamic image to your display.
Exercise 2 - Using Database-Driven Auto Complete
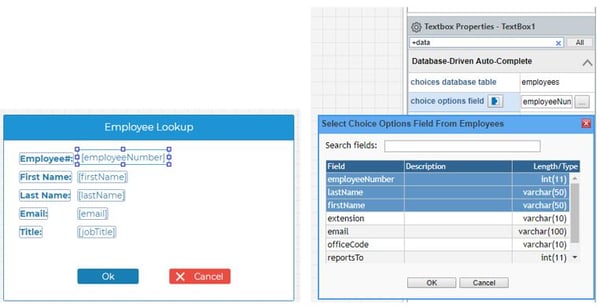
After switching back to the Visual Designer, select the employeeNumber text box and type +data under the 'Find Property' table on the far right hand side. Then type employees in the 'choices database table' property. Below that highlight the 'choice options field' table and click the '...' button. You will see multiple choices to choose from, select the first 3 options (employeeNumber, lastName, and firstName) and click OK and then Save.
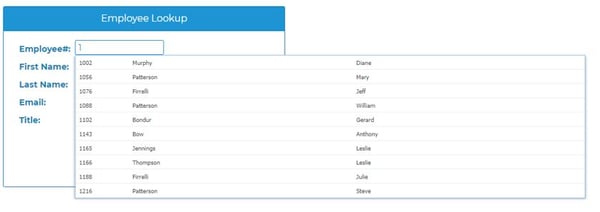
Test your auto-complete feature by launching the application in a separate browser and begin typing a value in the Employee # box to see if it begins to auto-complete for you.
Exercise 3 - Adding a Dynamic Image
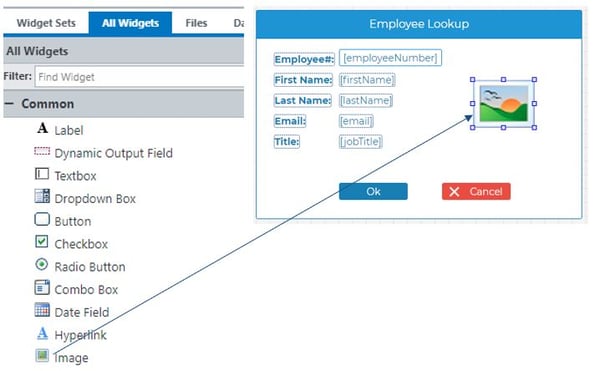
Begin by clicking on the 'All Widgets' tab and dragging the image widget on to your panel widget.
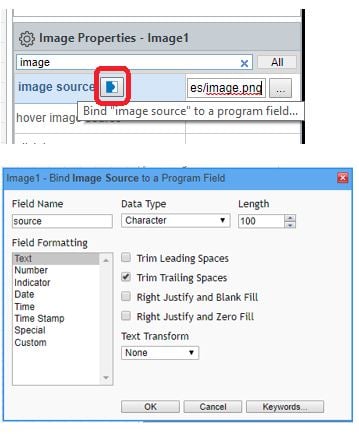
Highlight the image widget and scroll down to 'Field Settings' in the Image Properties and select 'Image Source' (you can also use the 'Find Property' search bar and type in Image Source to go directly there). Click on the 'Image Source' option and bind that property to the field name source.
Assign Employee Photo Source Field
Next you will want to add the following line of code to your HTML:
Now you can Save your work and Launch the application in a new browser tab. The application should look something like this: 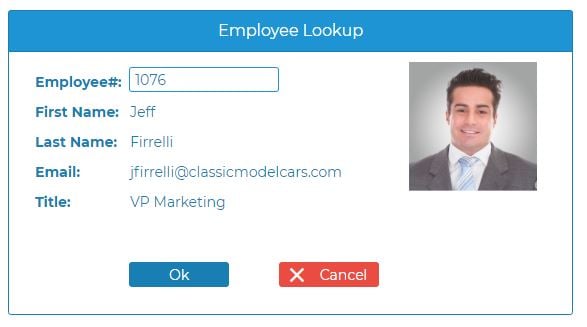
This quick and easy exercise has now given you a dynamic way to view employee records with little development effort.
In our next post we will learn how to use NodeRun to create a rich and complex grid based application that helps you list all of your employees.
If you missed it, our Guided Lab: Employee Data Application Part 1 showed you how to build your employee lookup application from scratch.


