


NodeRun is the newest Profound Logic product dedicated to making it easier for Node.js developers to create applications by moving development to a cloud-based environment. NodeRun comes with a full IDE with Visual Designer, editor, debugger, and Node.js already pre-installed. Some of NodeRun's most notable capabilities include design screens, the ability to develop and run application within the program, full debugging capabilities, the ability to install NPM packages, manage your own Node.js server, work with active sessions to see end-user activity, host database and built-in Database Explorer, a command-line terminal for full control of your space, as well as the ability to share and collaborate with other developers.
Getting started with NodeRun is quick. All you need is a modern internet browser (Google Chrome, Mozilla Firefox, etc.) and that's it. Every NodeRun Space is free to build and comes with its own files, database, and server. To get started visit NodeRun.com create an account and begin developing, it's that easy!
This 8 part blog series will give you a series of exercises to help you build a Node.js applications that work with employee data. This first exercise will show you how to create an Employee Lookup Module.
Exercise 1 - Employee Lookup
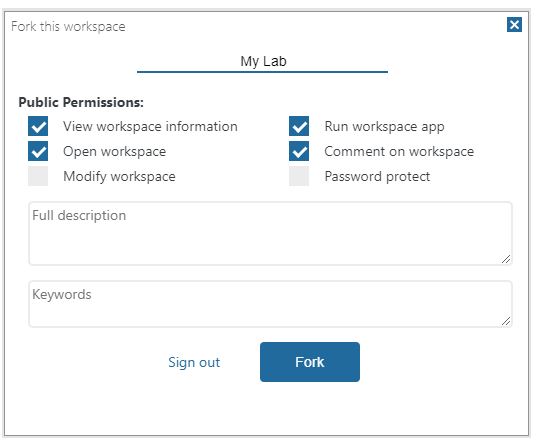
To begin, visit https://noderun.com/ide/profound-logic/guided-lab/ and press the Fork button on the home page (if you are not signed in, create an account or sign in). Give your space a name... for this example we will name it My Lab. After naming your space, click Fork and click Close on the next prompted screen. This will change the URL in your browser to show your profile name and your new workspace name.
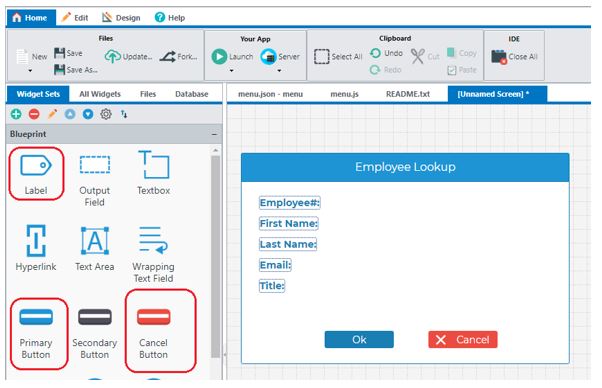
 Click the New button and scroll down to the Rich Display File option which will create a new display file in your IDE screen. Then click the Widget Sets tab and drag-and-drop the panel widget onto your display screen and name it Employee Lookup.

Next, drag-and-drop the Label widget onto the panel for each label that you want to add. After that you will want to add a Primary Button widget and a Cancel Button widget for an "Ok" button and a "Cancel" button.
Find Employee Database Table
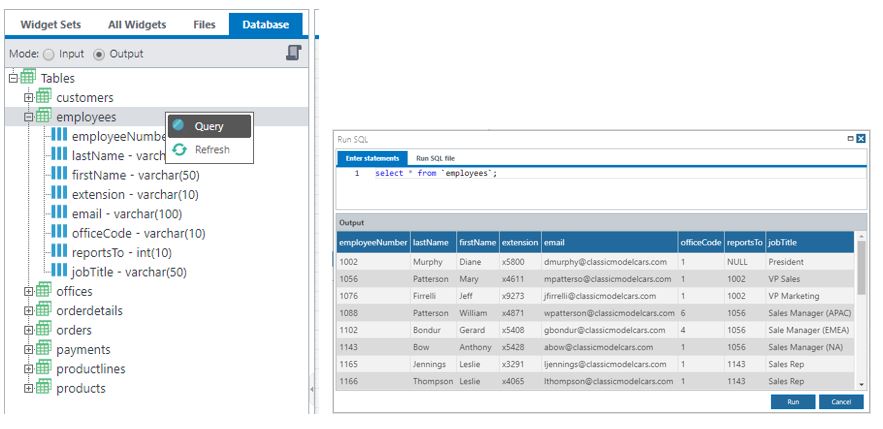
Under the Database tab find employees and right click. Then press the Query option to find and review your employee data.
Use Employee Database Table
Make sure you have the Input mode selected and drag the employeeNumber to your display screen.
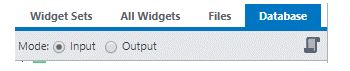
Next, switch to Output mode and drag the lastName, firstName, email, and jobTitle to your display screen. 
Bind Buttons
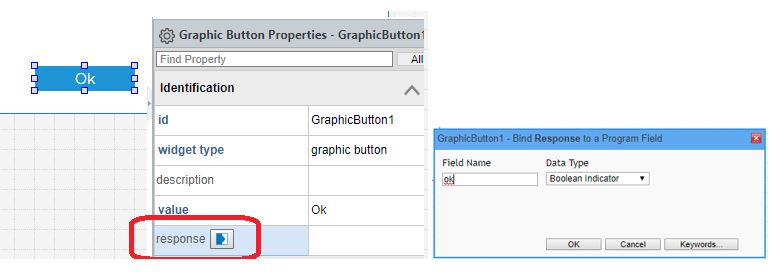
Select the Ok button and use the Graphic Button Properties on the right hand side to bind response of Ok button to ok and bind response of Cancel button to cancel. Please keep in mind that the case of the field names do matter. "ok" is not the same as "Ok."
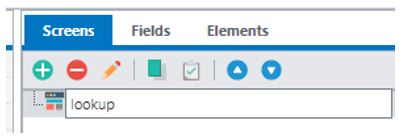
Name Your Screen + Save
Above the Screen Properties box you will see a Screens tab. Press the pencil/edit icon and name your screen lookup.
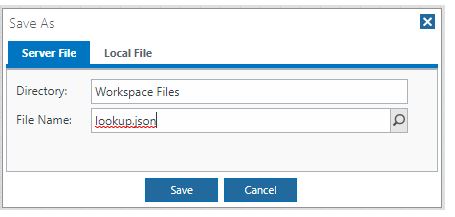
Next click the Save button and name your file lookup.json.
Create Node.js Script for Employee Lookup
Select the New button and scroll down to JavaScript File and enter the code as it is shown below and save it.
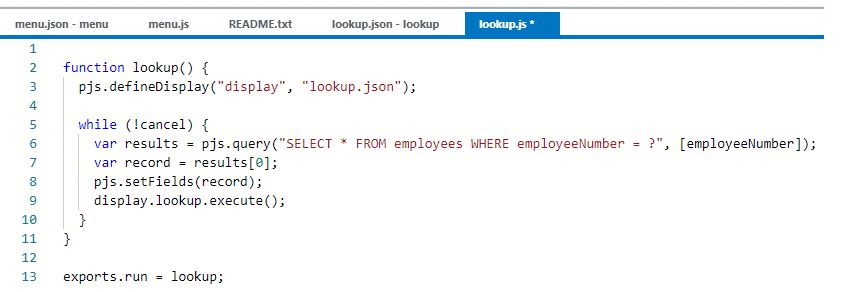
Code Explanation:
exports.run = lookup
- In Node.js, every public function must be exported
- In NodeRun, the name run indicates the main function to run when this script is executed
pjs.defineDisplay ("display", "lookup.json");
- The pjs.defineDisplay( ) API declares a Rich Display File and all of its fields within the function
- The first parameter ("display") becomes an object that contains all Rich Display screens as properties
- The second parameter ("lookup.json") refers to the Rich Display json file
display.lookup.execute( );
- display is the Rich Display File object
- lookup is the screen name
- The execute( ) method sends the screen to the browser, waits for the user to respond, and reads input from the user
while (!cancel) }
// ...
}
- Keeps executing while the Cancel button is not pressed
- cancel is a field bound to the response property of the Cancel button
pjs.query("SELECT * FROM employees WHERE emplyeeNumber = ?" , [employeeNumber]);
- The pjs.query( ) API executes an SQL query and returns a JavaScript array of records
- The first parameter is an SQL statement where ?'s are parameter markers
- The second parameter is an array of values to use for the parameter markers
var record = results [0];
- The SQL query expects only 1 record, so we retrieve the first record
- In JavaScript, arrays start with index 0
pjs.setFields (record) ;
- The pjs.setFields( ) API assigns fields from a JavaScript record or object to any field defined in your Node.js script, including fields defined with pjs.defineDisplay( )
- It's a quick way to move queried data directly to the screen
Create Try Your Application
Select the Launch button and select the Launch App in Browser Tap option. The running application will look like this:

In our next post we will learn how to use the database-driven auto-complete option as well as how to add a dynamic image to your display.
