NodeRun is the newest Profound Logic product dedicated to making it easier for Node.js developers to create applications by moving development to a cloud-based environment. NodeRun comes with a full IDE with Visual Designer, editor, debugger, and Node.js already pre-installed. Some of NodeRun's most notable capabilities include design screens, the ability to develop and run application within the program, full debugging capabilities, the ability to install NPM packages, manage your own Node.js server, work with active sessions to see end-user activity, host database and built-in Database Explorer, a command-line terminal for full control of your space, as well as the ability to share and collaborate with other developers.
Getting started with NodeRun is quick and easy. All you need is a modern internet browser (Google Chrome, Mozilla Firefox, etc.) and that's it. Every NodeRun Space is free to build and comes with its own files, database, and server. To get started visit NodeRun.com create an account and begin developing, it's that easy!
This 8 part blog series will give you a series of exercises to help you build a Node.js applications that work with employee data. This next exercise will show you how to create an employee listing application with a grid of your employee's records.
Exercise 4 - Employee Listing with Grids
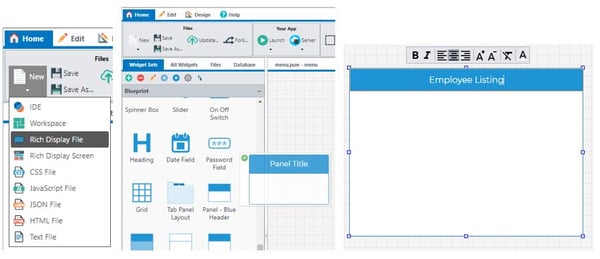
To begin creating your employee list click the New button and select Rich Display File. Next, drag-and-drop the Panel widget onto your IDE screen.
Add Grid and OK Button
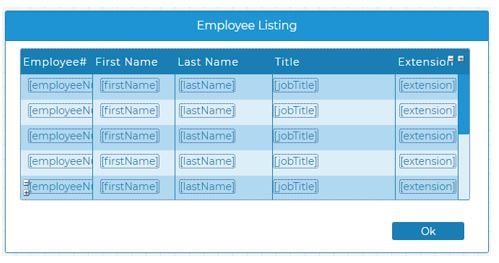
Next, drag-and-drop the Grid widget followed by a Primary Button widget onto your canvas. You can add columns by clicking the plus (+) sign on the grid widget in case there are not enough fields in the initial grid. You can rename the columns by double-clicking each column and entering the desired name. After naming your columns you can drag the database fields into the first row of your newly created grid. After adding the database you can double-click the button widget to change the text to "OK" then bind the OK field to the response property of that button widget (see how to do that in part 1 of this guided lab series).
Name and Save Your Screen and Grid as a Rich Display File
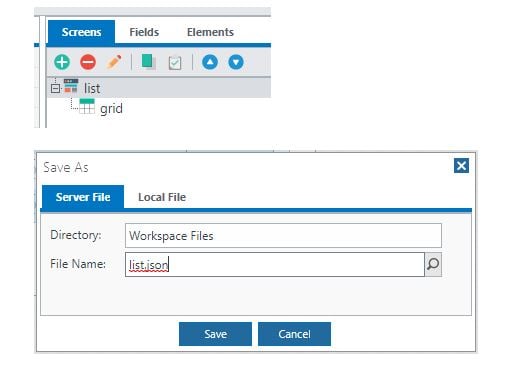
In the top right hand corner select the Screens tab and double-click the 'Unnamed Screen' (you can also click the pencil icon to edit this as well). You will need to rename the screen 'list' and then rename the grid 'grid.' Next, press the Save button in the top left hand corner and name the Rich Display File 'list.json.'
Create a Node.js Script for Employee Listing
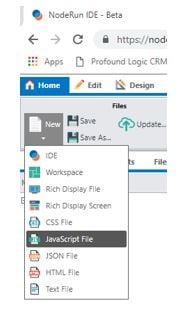
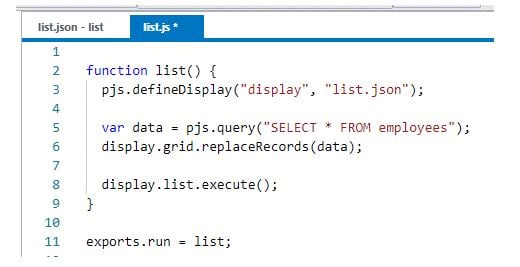
In the top left hand corner press the New button and select JaveScript File. Then enter the code shown below and save as list.js.
Code Explained
 Display is your Rich Display File object while grid represents the name given to your grid on the screen. The replaceRecords() method replaces all records in the grid with an array of records passed in as a parameter. NodeRun supports a variety of methods to populate grids.
In our next post we will learn how to use NodeRun to Enhance your Employee Grid Application with features like sort-able and movable columns as well as connect listing to a lookup function.
If you missed out on any of our previous Guided Labs here is a recap of those exercises:
- Guided Lab: Employee Data Application Part 1 showed you how to build your employee lookup application from scratch.
- Guided Lab: Employee Data Application Part 2 showed you how use the database-driven auto-complete option and how to add a dynamic image to your display.


