


Welcome back to our guide on using widgets inside of Profound UI. Catch up on the steps we covered in Part I here, and Part 2 here.
This series will explain how you can use widgets from a separate, unrelated library of widgets—PrimeUI—so that you can populate these widgets with data from a server and submit data from the widget back to the server. Not only will these widgets be usable in your production environment, you can also see them rendered in design-time in Visual Designer for drag and drop design.
This article will explain the final steps to setting up the property setter function and how to add the toolbox definition.
Property Getter
The last thing to mention from the property setter function is “getCustomPropValue”, the getter function:

The purpose of the getter is to pass data from the widget to Profound UI when the screen submits so that the data can be sent to the server.
Like with our event handlers, bind() is creating a new function from an existing one--“puiprime.puirating.getter” in this case. The widget’s main DIV element is passed to bind, allowing calls to the new function to reach the DIV via the “this” variable.
Binding is necessary in this case because some custom code calls the “getCustomPropValue” function when the screen is submitted, and only the property name parameter is passed. Essentially, we use “bind” to provide extra information to the function without changing its parameters. (See the “pui.beforeRespond” function definition in the custom-widget-autobind.js file from the previous article.)
The property getter function is simple:

It maps the Profound UI “value” property to the PrimeUI rating widget’s “getValue” method via our accessor utility.
Note that if you wanted other properties to be bound (in the Profound UI meaning of bind), then support for those could be added to the getter in a different “if” block. You would map a Profound UI property to another call to a PrimeUI method via “widgetAccessor”. Also, the array passed as the second argument to “puicustom.initWidget” in the property setter would need another string containing the other bind-able property name.
Custom Properties
You may have noticed in the property setter that “rating stars”, “rating cancel”, “rating onrate”, and “rating oncancel” are not standard, built-in Profound UI properties. Since there were no built-in properties that could be used to implement the widget, I defined my own. I prefixed the property names with “rating “ because I didn’t expect other widgets to use the same properties, and I was concerned that other widgets’ properties would have different formats or expected values.
For each custom property an API call must define it. For example, “rating stars”:
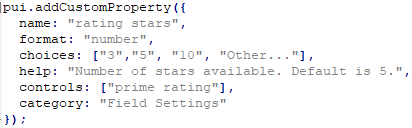
This information helps Designer know how to display the property in the Properties Window.
In order to implement the custom property, you would need to also include the property name in the call to “pui.widgets.add” and support it with a property setter function, as we’ve already done. The process is no different for PrimeUI widgets than with other custom widgets. See the previous article for more details.
Toolbox Definition
The last thing required to add the widget to Profound UI is the toolbox definition. This API call makes the widget appear in the toolbox and optionally sets some default property values and defines a proxy element:
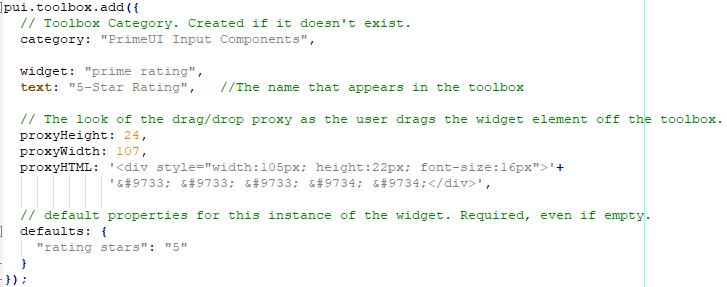
With that code, the widget can appear in Visual Designer’s toolbox, allowing a user to drag-and-drop a new element onto the canvas:

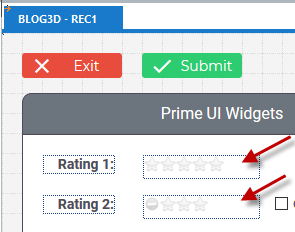
I chose some simple HTML to represent the widget in the proxy element. But once the widget is dropped onto the canvas, then the PrimeUI code renders it:
The rendering is how you would see it in a runtime application:
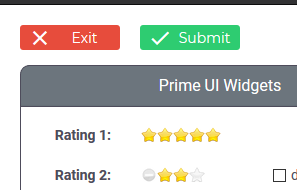
Hence, with the right code you can drag-and-drop PrimeUI widgets onto a design canvas as you would Profound UI widgets.
Workaround Code for Visual Designer
If you read the code for the “puiprime.dependencies” declaration you would see that something odd happens in design mode—a delayed call to “puiprime.removeDefine”. If you were to simply include the PrimeUI JavaScript file like a regular dependency, then the PrimeUI code would clash with the code-editor JavaScript code included with Visual Designer. A workaround is to wait for the code-editor JavaScript to finish—something that takes under two seconds—and to then undeclare a global “define” function before loading the PrimeUI code:
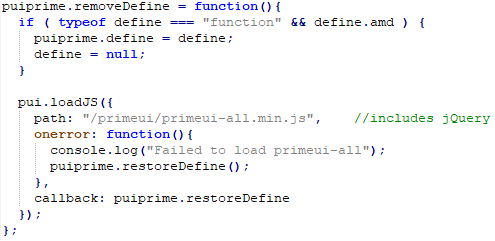
Removing the “define” causes the jQuery and PrimeUI code from “primeui-all.min.js” to load in a way that doesn’t conflict with the built-in code-editor. When the PrimeUI file finishes loading, then the “define” is restored:
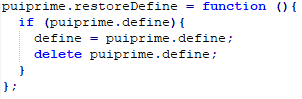
Restoring “define” allows the code-editor to load or reload modules as it needs to.
Note that this workaround is only necessary for Designer; it’s unnecessary for runtime, as you can see in the “condition” function in the declaration.
That covers part three of using PrimeUI’s Javascript widgets for development inside of Profound UI. Once you can import PrimeUI widgets you can modernize your IBM i application interfaces faster and easier than doing it all yourself. Keep a lookout for part four, which will finish up our series.
