


Welcome back to our guide on using widgets inside of Profound UI. Catch up on the steps we covered in Part I here.
This series will explain how you can use widgets from a separate, unrelated library of widgets—PrimeUI—so that you can populate these widgets with data from a server and submit data from the widget back to the server. Not only will these widgets be usable in your production environment, you can also see them rendered in design-time in Visual Designer for drag and drop design.
This article covers the remainder of what you need in order to use PrimeUI widgets.
Property Setters for PrimeUI Widgets
Property setters contain most of the custom coding required. Before proceeding, we should keep in mind that input widgets should pass data to the server when the screen is submitted.
The article, “Painlessly Passing Custom Widget Input Data to the Server”, explains how to make custom widgets that pass data to the server. That article provides code to do so, and this article’s property setters use that code. (All code explained below is included in a source code file, primeui-widgets.js, linked at the bottom of the article.)
Declare the Widget
Adding the widget to Profound UI’s framework involves one API call to pui.widgets.add, to which some names, defaults, and property setter functions are passed.
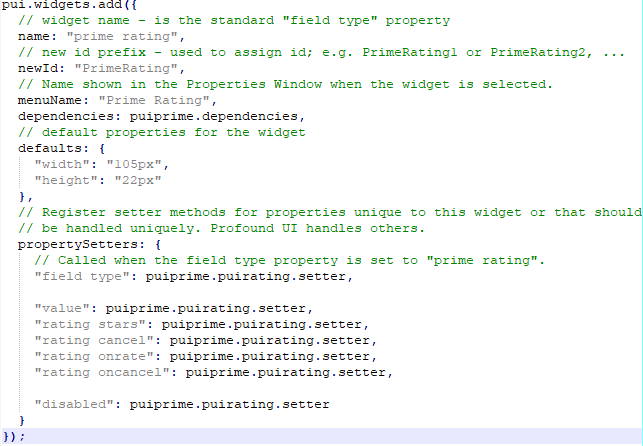
Dependencies
The “dependencies” property tells Profound UI that the widget depends on files that should be loaded on-demand when the screen using this widget renders. Note that instead of containing an array of filename strings the property is set to “puiprime.dependencies”, which is defined elsewhere. It becomes clear why by looking at the definition:
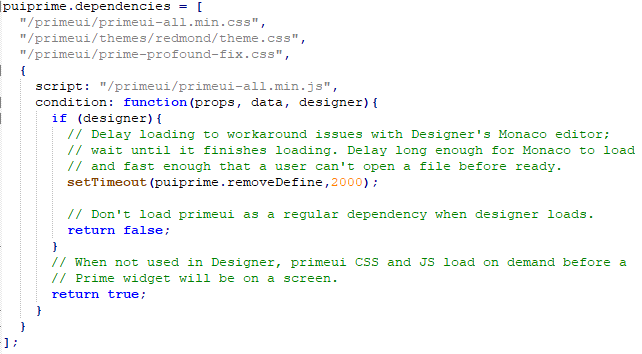
The dependency code loads all files needed by PrimeUI on-demand when in runtime—including a style theme—and in Designer, the code loads in a way to avoid conflicting with existing code in Designer.
It’s best to declare that list of files and the logic in a way that can be re-used by multiple PrimeUI widgets.
Property Setter Function
Note in the above pui.widgets.add call that the propertySetters are all assigned to the same function,“puiprime.puirating.setter”. For each property being set some of the same things need to happen; i.e. validate arguments, define a configuration object, and pass information to the appropriate PrimeUI rating method. I chose to use a single “setter” function to handle all properties to avoid redundant code. (Using a different function for each property and having shared validation, configuration, and initialization functions would also work.)
Below is the setter function for “puirating” properties. Profound UI calls it for each property being set while rendering the widget in either Visual Designer or in runtime:
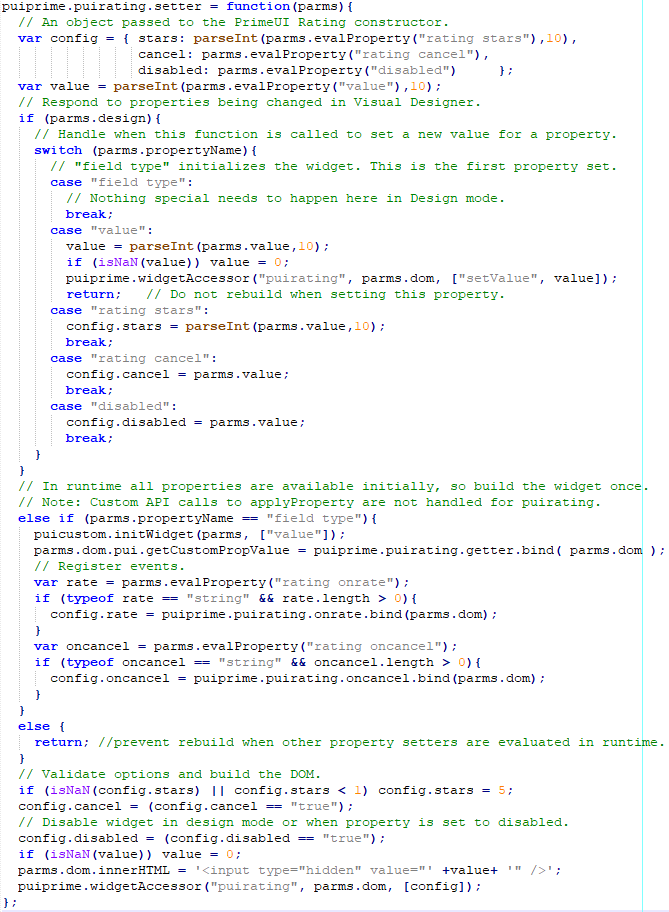
Because this property setter function is called in multiple contexts there is logic to determine which property is being set and what to do in the different contexts. In design mode the properties can be set in any order; thus, the widget gets rebuilt after most properties change. (Deciding when to rebuild was a process of trial and error.) In runtime the code expects all properties to be known when the first property setter, “field type”, is called; therefore, only the “field type” property setter does anything in runtime.
The “field type” is the first property being set in either runtime or design mode, so if any other properties expect DOM elements to be setup a certain way, then those elements should be setup during the “field type” setter. Notice in the runtime “field type” setter that a call is made to “puicustom.initWidget”—a custom function from a previous article that allows input data to be pulled from the widget when the screen is submitted. The call to “initWidget” and assigning a “getter” function to “parms.dom.pui.getCustomPropValue” enable the widget to pass data to the server when a screen submits. (The “getter” is discussed in a subsequent section.)
For all properties being handled, this code calls a utility function, “widgetAccessor”. Basically, this is a wrapper that calls the PrimeUI code needed to build the PrimeUI widget or to change something in it. In our “puirating” setter function, the “widgetAccessor” is called for one of two reasons: to call the “setValue” method on the widget, or to construct the rating widget using the provided configuration object.
Wrapper for PrimeUI Methods
Below is the “widgetAccessor” code, which makes it easier to call PrimeUI methods:
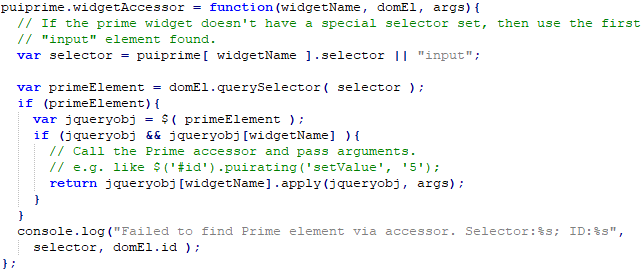
This accessor is necessary because PrimeUI constructors can move elements around in the DOM to where we did not insert them. Yet, the correct DOM element—one that moved from where we created it—must found and passed to the PrimeUI method (after being wrapped in a jQuery object). Our utility function encapsulates this small mess, leaving the property setters a little cleaner.
If you’re interested in adopting new methods in widgets not covered in this article, then understanding what the accessor does is helpful. In the property setter this line of code,

would be functionally like the following:

The latter resembles code from the PrimeUI documentation:
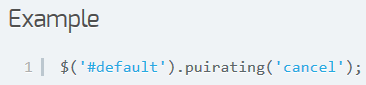
Therefore, you should be able to call any methods you see in the documentation by calling “puiprime.widgetAccessor”, passing the widget name as the first argument, the DOM element (the DIV encapsulating the widget) as the second, and any PrimeUI method arguments in an array as the third argument.
Event Property Setters
Other notable pieces of the property setter are the event handlers, “rating onrate” and “rating oncancel”. These are custom properties for JavaScript code that runs when events happen: a rating is set and a rating is cancelled, respectively.
Looking at the “rating onrate” event, we can see a JavaScript bind() on another function, “puiprime.puirating.onrate”:

In case bind() is unfamiliar: “The bind() method creates a new function that, when called, has its this keyword set to the provided value.” That means “config.rate” is assigned a new function whose code is taken from “puiprime.puirating.onrate”, and the new function’s “this” variable is a DOM element we provided when calling bind. That “onrate” function code is here:
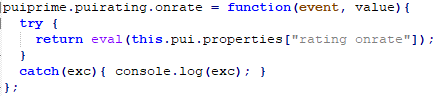
Binding the onrate function’s “this” variable to a certain DOM element makes it easier to extract the “rating onrate” property value that gets evaluated.
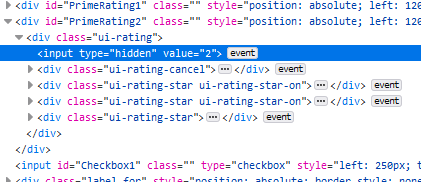
There are alternate ways to extract that property value. For example, the “event” argument references the “input” element hidden inside the widget’s wrapper DIV in the DOM, as seen in the following debugging stack inspection:
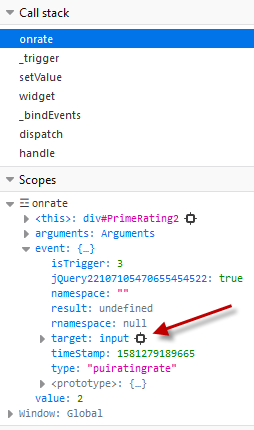
That event.target is the “input” element that our “field type” property setter created and that the PrimeUI code moved:
You could assume that the rating widget always moves the “input” in the encapsulating DIV’s first child’s first child in the DOM tree and code accordingly (e.g. use “event.target.firstChild.firstChild” and assign the function without using bind—instead of binding and using “this”). I prefer not to assume and to take advantage of bind, because the PrimeUI documentation doesn’t guarantee element placement in the DOM, and because PrimeUI widgets manipulate the DOM without consistency.
That covers part two of using PrimeUI’s Javascript widgets for development inside of Profound UI. Once you can import PrimeUI widgets you can modernize your IBM i application interfaces faster and easier than doing it all yourself. Keep a lookout for part three, which will discuss property getters and finish explaining what you need.
File Downloads:
prime-profound-fix.css
primeui-widgets.js
blog2020-02-10.json
