


Profound Pro Tips is a blog series focused on issues that our support team receives and questions our Profound Logic customers have. Have a topic you’d like to see a Profound Pro Tip for? Please contact our team or leave us a comment below. We’re here to help!
Today’s Topic: Painlessly Passing Custom Widget Input Data to the Server
Profound UI provides dozens of useful widgets for application displays, but sometimes developers find it better to write their own or adopt widgets from other frameworks. The Custom Widget API makes that possible, but a common question is: how do you pass input from a custom widget to the server-side program?
The answer is: by binding an input field and writing custom JavaScript to read that input. This blog illustrates how to handle bound input fields on custom widgets. First, we look at code for creating a simple color-picker widget. Next, we discuss a limited solution that requires modifying an “onsubmit” method of every screen using the custom widgets. Finally, we study a solution that automatically passes the input data to Profound UI without needing to modify any “onsubmit” events.
All code for this article is available for download. See links at the bottom.
Binding Fields on Native vs. Custom Widgets
Field binding is a way to pass data between the Rich Display screen and the server-side program (RPG, Node.js, COBOL). Data is exchanged two times: first, when the program writes output to the screen; second, when the screen is submitted, and the program receives the input.
Output data can be displayed directly on the screen in a widget, or it can determine behavior of the widgets displayed on the screen, depending on which properties are bound. Most widget properties can be bound. Profound UI automatically passes bound output data to the widget—even when the widget is custom or has custom properties.
However, Profound UI does not automatically handle bound input data on non-native, custom widgets. Of course, Profound UI knows how to extract data from its own widgets, because those widgets were designed for the framework, and the framework knows where the data resides on them. Conversely, Profound UI has no way to know where the value could be stored on the custom widget.
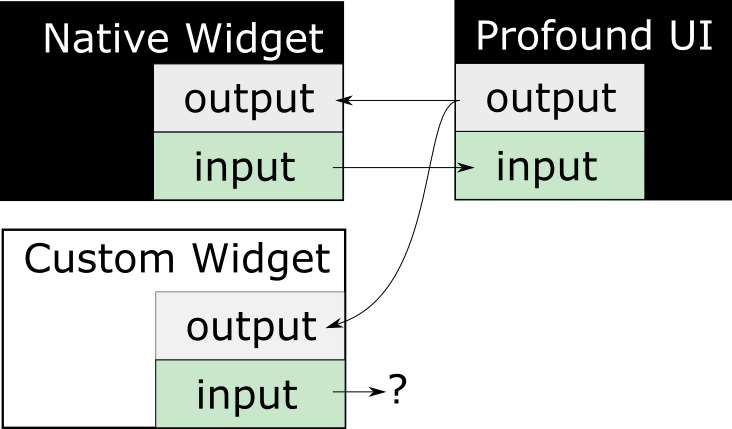
Thus, the framework does not automatically pass data from bound fields on custom widgets to the server when a screen is submitted; a gap exists, and custom code must fill it.
Before we bridge the gap, we create a custom widget, which we will then use for demonstrating binding an input field.
Create a Basic Custom Widget
To create a custom widget from scratch there are minimally three things to define: its toolbox entry, the widget’s properties, and the widget’s property setters—how it handles properties being set. Also, a unique name for the type of widget must be decided, and no other widget can use that name.
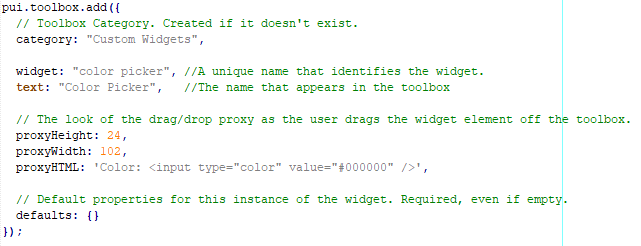
Defining the toolbox entry is simply calling the “pui.toolbox.add” API method and providing the unique widget name, toolbox category to place it in, proxy appearance, and optional default property values.
Toolbox Entry
In the image below, code is provided for defining a toolbox entry for “color picker”, the widget we are creating:
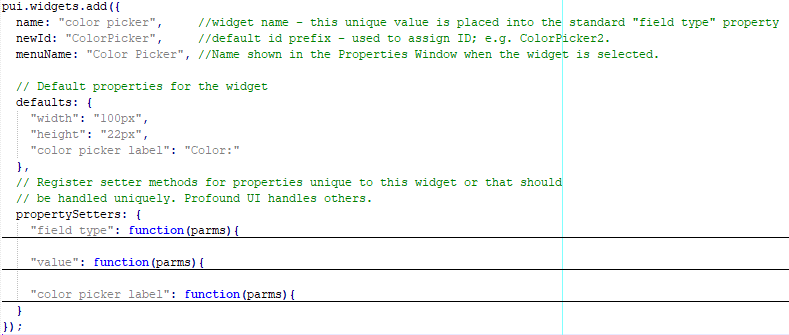
Widget Properties
Defining the “color picker” widget properties is similar: call the “pui.widgets.add” API method and provide some names, defaults, and the “propertySetter” functions:
Property Setter Functions
Property setters are responsible for translating the widget properties into different output data or behavior for the widget. These are the meat of the custom widget where the most custom code will be.
These setters must handle two different contexts: design time and runtime. Properties may behave differently at design time versus runtime. For example, in design time, it is unnecessary to handle certain mouse events, which can be ignored; but at runtime, any mouse event code should be executed.
To understand how to write property setters it is necessary to know how Profound UI calls them. When Profound UI renders a widget on the screen, it adds an element to the document—usually a DIV. Then, for each property defined for the widget and specified for that instance of the widget, property setters are called starting with “field type”. For example, if a custom widget handles “value”, and value is set, then the “field type” setter is called first; then, the “value” setter function is called.
The render code passes an object argument to each property setter. The object contains the DIV element, the property being set, properties already set, and the value being set. If the field is bound, then the value being set is the data from the server-side program. This is the behavior in both runtime and design time. In either design time or runtime, a property can change after the widget is rendered; so, it is important to use the newest values in property setters. For example, when “value” changes, the value property setter should use the value passed to it and not rely on the previous value. (Otherwise, especially in Designer, the state of the widget will not reflect the current property values.)
So, here is the meat of our “color picker” widget:
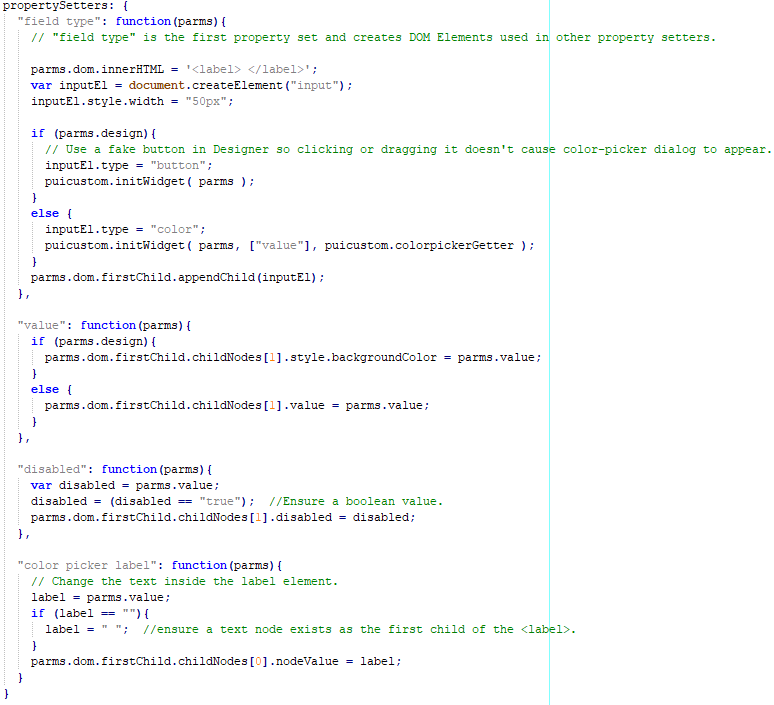
The “field type” setter adds a label and input element to the DIV element, which is referenced as “parms.dom”. The other setters rely on the DOM structure created in the “field type” setter, and they change only what is necessary.
In the “field type” setter, the referenced “puicustom.initWidget” is custom code we will discuss later in the Handling Bound Input Fields section.
Properties such as “width” or “height” are handled by Profound UI by setting the width and height of the DIV containing the custom widget, so it is usually unnecessary to write setters for those and other built-in properties. Since only the button inside the DIV should be disabled, we also implement a “disabled” setter.
Note that there is another property, “color picker label”, that is not a native Profound UI property. We’re defining “color picker label” for this widget by adding its property setters and by doing one more thing, covered next.
Custom Properties
To make Profound UI aware of a new, custom property, we call the “pui.addCustomProperty” API to define it:
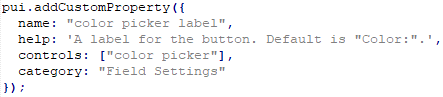
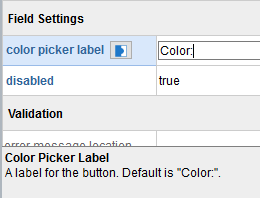
Name is the name of the property and should match the property setter and “defaults” value. Help appears in Designer when the property is selected:
Controls tells Profound UI only to make this property appear for the specified list of widgets. Category tells Designer where to show the property in the Properties Window.
There are other configuration options available to control how Designer presents the property setting dialog, but we won’t discuss them here.
Almost Ready
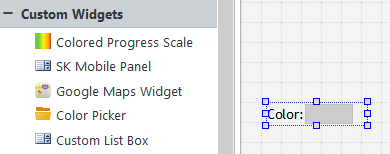
By defining the toolbox entry, the widget properties, property setters, and the custom property, the widget is ready to be used. It can be found in Visual Designer’s toolbox and dragged onto the canvas:
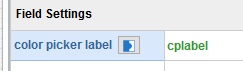
A screen designed with the widget can be used in a program, and the “color picker” will be rendered. In fact, custom properties, such as “color picker label”, can be bound to program output and will use it. Here is the designer property:
The RPG program code:
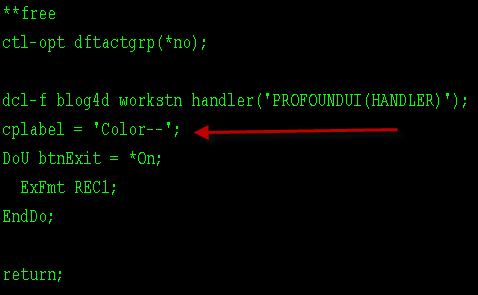
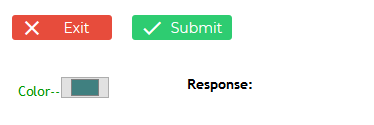
And the resulting display:
However, only the output properties are handled at this point. There’s no way for Profound UI to know what to do with input properties. That is, what if we want to bind the “value” property so that it is treated as input, so it can be passed to the program:
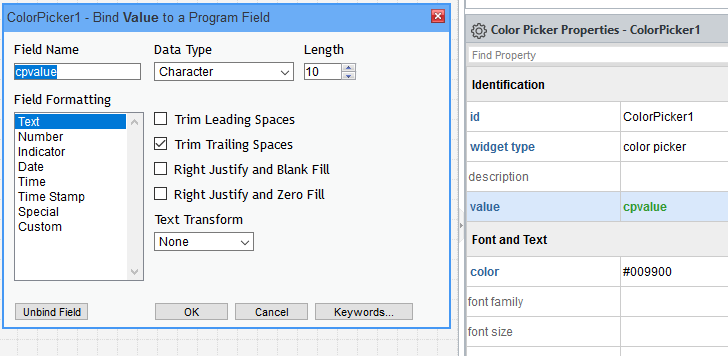
With the code presented so far, nothing would happen with the bound input field, “cpvalue”.
Handling Bound Input Fields
We’ve seen that through custom property setters, we can send program output to custom widgets. However, there’s currently no equivalent for bound input fields in Profound UI. There are no property “getters”, so there’s no automatic way to extract data from a widget. Custom code must be written to extract widget data and pass it to the framework, which then sends it to the server-side program:

We’ll discuss two ways to write to the page response data.
Custom “onsubmit” Code
As it happens, since March 2017 it’s been possible to extract the necessary field information from custom widgets and add it to the page response, causing that data to flow to the server-side application. The process required adding code to the “onsubmit” event of every record format that used a custom widget with bound input fields.
You could define a global function like this:
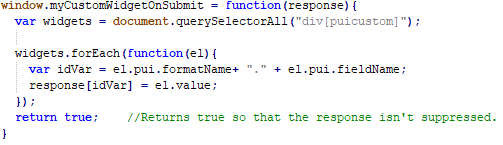
Which would look for any custom elements (with the “puicustom” attribute set) and use the “value” property from the element as the value and always add it to the response.
With that function, each of your “onsubmit” values would be:
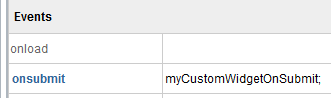
This can work; however, it has a big disadvantage: developers must remember to set “onsubmit” for every screen using the custom widget. Setting every “onsubmit” can be tedious or unfeasible, especially when working with hundreds of screens.
Custom, Generic, Global Code
Fortunately, Profound UI has a feature that can be used to avoid coding every “onsubmit” function that uses custom widgets with bound input fields. Defining a “pui.beforeRespond” function allows developers to essentially code all “onsubmit” functions at once—that is, any page response goes through the “pui.beforeRespond” function before being sent to the server, and no “onsubmit” function needs to be coded. (“pui.beforeRepond” has been available since May 2017.)
Like the onsubmit code, the beforeRespond code would do a few things:
- Find each custom widget’s element in the HTML document (DOM)
- Determine which properties on those elements are bound input fields
- Extract the value from the widget
- Format the value how the program expects it; e.g. no characters in numeric-only fields
- Add the value to the response, including the record format name and field name
Profound UI does none of those things for us, so we must write custom code for each. For your convenience, I’ve already written the generic utility functions to handle four of those tasks. Some are discussed next, followed by the specific “getter” code for extracting values from widgets.
Gather Information – initWidget
In short, we write a function that puts everything “pui.beforeRespond” needs onto the widget’s DOM element.
If we gather the needed property information, record format and field names when the widget is being created, then it’s easier than finding them in beforeRespond. Also, if we set a special HTML attribute on each custom widget’s DOM element, then it’s trivial to find custom widgets in beforeRespond. Naturally, we make a global method “puicustom.initWidget” to set the attribute and gather the other information:
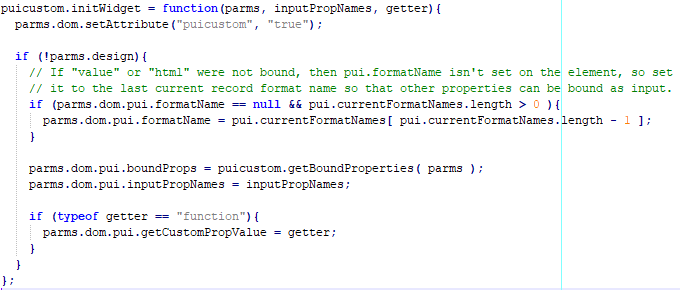
In the code is a call to “puicustom.getBoundProperties”, which is another custom function that is included with this article’s source code. getBoundProperties looks for the bound field information located inconveniently in a massive object, pui.layers. (Note: “puicustom” is an object that we’ve defined prior to this function definition.)
As mentioned above in Property Setter Functions section, initWidget gets called once by the “field type” property-setter. In addition to the “field type” property-setter argument, initWidget accepts other arguments, both of which are added to the DOM element for use in pui.beforeRespond. The “inputPropNames” is just an array of strings identifying in which properties to look for bound input. The “getter” argument is discussed next.
Property Getters
We’ve seen property setters, which take property data and change the DOM element. Thinking, abstractly it would be logical to have property getters, which would extract data from the DOM and return it for each input property. You can see that initWidget attaches a function to the DOM element and names the reference, “getCustomPropValue”. As you might expect, pui.beforeRespond calls “getCustomPropValue”, passing it some custom “property-getter” information as seen in the “getter” definition:
The function is modeled after the property setter functions, expecting the property name and the DOM element. Unlike our property setters, this getter must handle all properties, explaining why there’s a test for the property name.
Property Getter summary:
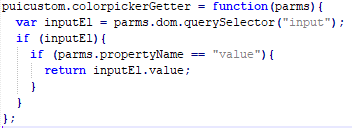
- There’s a global function defined that handles the getting color-picker “value”.
- The color picker’s “field type” property setter calls initWidget, passing a reference to the global function:
- initWidget attaches the function reference to the DOM element
- beforeRespond later calls that function.
Format Values for the Response
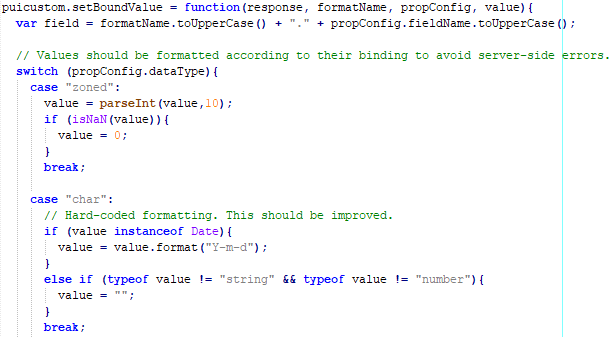
We have discussed almost everything needed by pui.beforeRespond. One remaining topic is formatting: the program expects data in a certain format, and it may crash if the display supplies invalid input data. Profound UI handles this task automatically for native widgets, but not for custom widgets. Therefore, it’s a good idea to write some basic formatters. Basically, handle all the Profound UI data types (modeled after IBM i data types) and make them work with JavaScript data types. Part of our formatter is shown here:
[…]
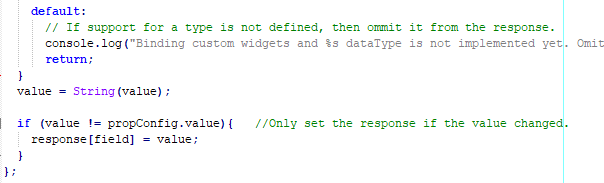
This function formats a value and adds it to a response object using the correct “FORMATNAME.FIELDNAME” key. The implementation is incomplete, so it also writes to the browser console that it ignored an unsupported format. As you might expect, this function is called by our custom pui.beforeRespond.
pui.beforeRespond
Finally, this global function is what takes all the pieces we’ve built so far and uses them to augment the screen response:
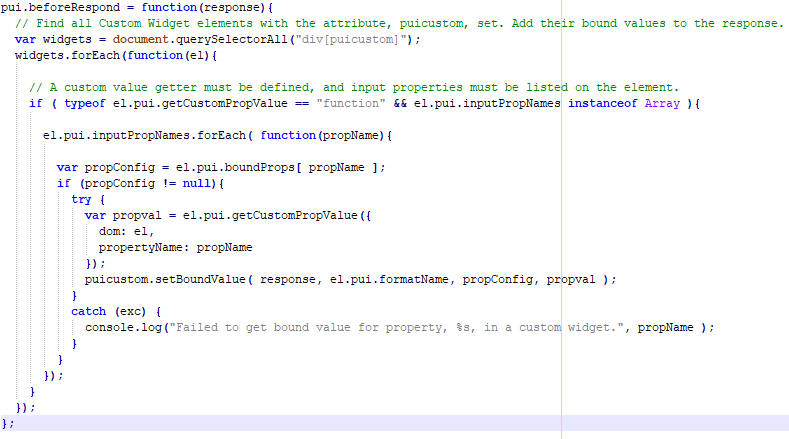
- It finds each custom widget
- It checks if the custom widget has input properties defined
- It checks if those input properties are bound on the widget instance
- It calls the property getter
- And it calls “setBoundValue”, which formats the value and adds it to the response
Conclusion
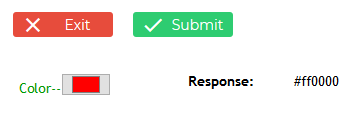
Using the code provided with the article you can develop and deploy custom widgets whose data is automatically passed to page-response values. From the page response, our server-side program can handle them. In our simple color-picker example, our program finally can display the value of the color picked by the button:
Binding input data allows for a powerful degree of flexibility with Profound UI. It is possible to use third-part widgets and make them work like Profound UI widgets; or, you can dream up your own new widget. Thank you for reading!
The provided code is free and open source under the MIT license. You can download it in full in “custom-widget-autobind.js”.
The “colorpicker.js” file demonstrates the basics of creating a custom widget using the mini-framework set out in “custom-widget-autobind.js”.
Feel free to leave feedback for improvements by posting on our forums, http://www.profoundlogic.com/forum/. If enough people show interest, we could enhance Profound UI to simplify or eliminate some of the sample code by making Profound UI take care of the messy parts.
Thanks for reading this issue of Profound Pro Tips! Please comment below with any questions you might have, or if you have any ideas on the next topic, we should cover. You can also ask questions and find solutions on our Profound Logic Forum.
