


Profound Pro Tips is a blog series focused on issues that our support team receives and questions our Profound Logic customers have. Have a topic you’d like to see a Profound Pro Tip for? Please contact our team or leave us a comment below! We’re here to help!
Today’s Topic: Adding image upload to Genie screens
You know that you can rearrange and beautify your 5250 screens using the Genie editor. But did you know you can add images that change based on the on-screen information and even add the ability for a user to upload new images? This blog post will show you how to add an image and upload option to an item description page.
Here is the screen we will be working with displayed on the 5250 emulator: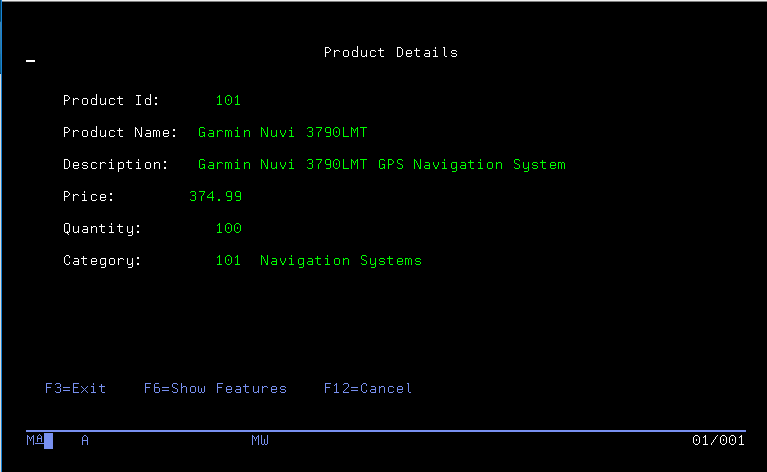
The same screen displayed in Genie with no modifications: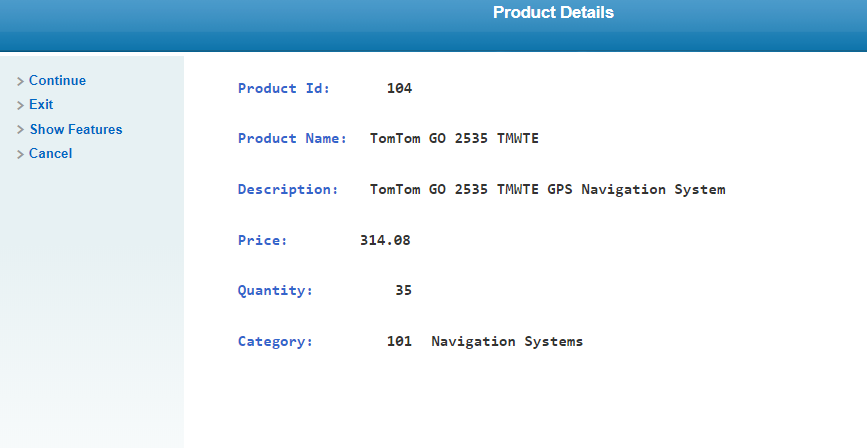
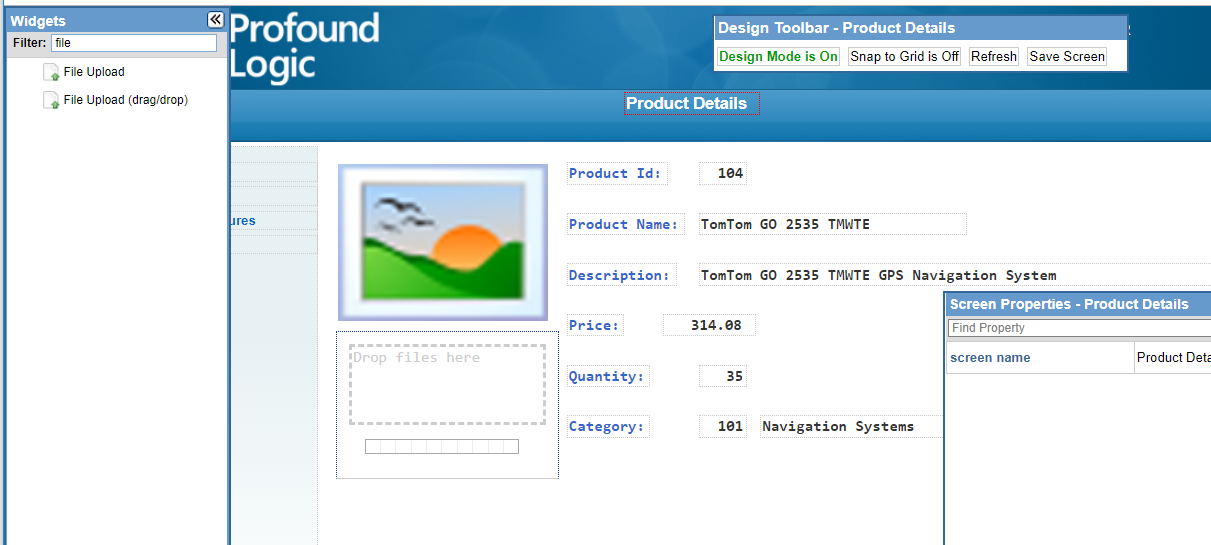
Design Mode
Now turn on Design Mode using the genie Design Toolbar button. I like to position the image to the left of the description text on screens like this so I’ll start by moving the fields to the right to make room for the image. Then open the Widgets toolbox on the left and drag out an Image widget and a File Upload (drag/drop) on to the screen and resize and position them.
Before I can set the properties of the widgets I have to determine what element to use to retrieve the current Product Id from. In design mode click on the product Id field and check the properties box to find the element id. In this case D_4_20.
The element id is created by Genie based on the location of the field on the 5250 display. It will stay the same as long as you do not move the field in the DDS file, regardless of where you move the field to with the Genie Designer.
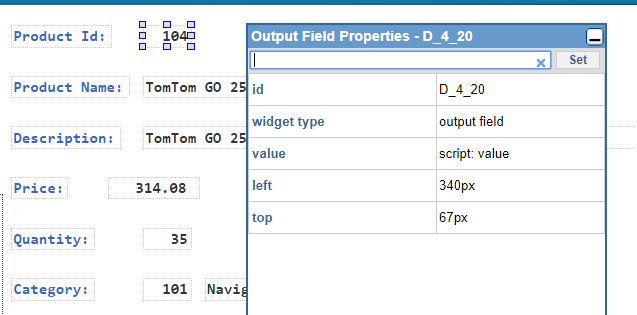
Image Widget
The next thing to do is to set the properties for the Image widget to point to a location in the IFS to store the file and name the file in a way that it can be retrieved by item id.
Click the Image widget and locate the image source property in the Field Settings section. Right click on the property name and select Open in Editor. This will open a larger text editing area that makes it easier to enter longer values. This property can be set to a specific image path and name if you always want to display the same image on this screen. However, we want the image to change based on the value of the Product Id, or more specifically: D_4_20. In order to do this we have to use a little bit of JavaScript in the Image Source property.
js: "/profoundui/userdata/images/products/" + Number(get("D_4_20")) + ".jpg?rnd=" + Math.random()
The js: tells the framework that this is JavaScript code. “/profoundui/userdata/images/products/” is the relative path to where we will be storing the files. /profoundui/userdata/images/ are folders that are installed with Genie. The full path in the IFS for a standard installation is IFS\www\profoundui\htdocs\profoundui\userdata\images
The products folder needs to be added to the ifs at this location or the upload will fail because it does not automatically create folders.
The get(“D_4_20”) gets the value of the D_4_20 element, and the Number() ensures that it is represented as a numeric value which will put a 0 in the query if there claim number is not populated. Without Number() a 0 value would return an empty string which would cause an error. I’m going to be saving the image as a .jpg so that extension is appended to the file name. Finally Math.random() appends a random number on the end as query string parameter rnd. This value is not part of the filename but instead is being used to make sure that the browser is not caching the previous image and preventing you from being able to see a new image when you change it. Whether or not caching causes an issue is based entirely on your browser and you may not need the random number at the end. But I included it to make sure no one has a problem with caching which can be very frustrating if you don’t understand why your image isn’t changing.
Altogether this line is telling the widget to load an image whose name equals the product id with a .jpg extension from the products folder.
File Upload Widget
The last thing to do in the Genie Designer is to set the properties for the File Upload widget. There are several properties to set in the File Upload widget. These are all located in the File Upload section of the properties. You can easily jump to that section by typing +File in the Find Property box.
Auto upload – The auto upload property should be set to true. This will cause the image to be uploaded when it is dropped on the widget.
Number of files and size limit – Number of files should be set to 1 as I am only supporting a single image per product. The size limit can be set to whatever value you feel is a reasonable maximum file size in MB for the images. I left it at the default of 10 though in many cases it could be set much lower.
Target directory – This should be the same directory that it used for the image source. However, this path needs to start at the ifs level. For this example with a standard installation the path is:
/www/profoundui/htdocs/profoundui/userdata/images/products
Rename to – I will use this property to rename the file to the product id. The code is similar to the code used for retrieving the image.
js:Number(get("D_4_20")) + ".jpg"
overwrite files –I set overwrite files to true so that I can replace an image when needed.
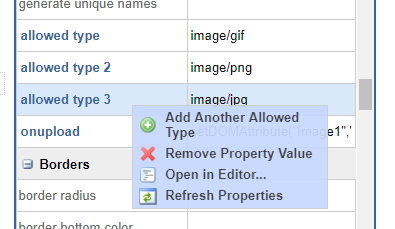
Allowed type – I want to make sure that only images are uploaded. The available image types in the drop down include image/gif, image/png, and image/jpg. I want to allow all three but no other type of file. To do this I right click on the property name and then select Add Another Allowed Type. Doing that twice will add two additional properties and then I simply select one of the image types for each.
Onupload – The final property to set is the onupload event handler. I want the image on the screen to be reloaded when an image is uploaded. To accomplish this I add some JavaScript code to the onupload which will be run after a new file is uploaded with the widget.
setDOMAttribute("Image1","src","/profoundui/userdata/images/product/" + Number(get("D_4_20")) + ".jpg?rnd=" + Math.random());
setDOMAttribute is used to set an attribute of an element in a web page. In this case I use it to reset the src attribute of the image1 element. This causes the image to be retrieved again which will replace the image on screen with the one that was just uploaded. You’ll recognize the path and image name code from the image source and file target properties.
Select one or more fields as screen identifiers and then save the screen modifications and turn off the designer.
Security Exit Program
There is one last thing you will have to do if this is your first time using a file upload widget. Security for the file upload widget is controlled by an exit program. You can find all of the details on the exit program in the the documentation at http://www.profoundlogic.com/docs/display/PUI/Security
The installation includes a sample source code which you can copy to your own source directory and modify to allow specific file uploads based on file type, size, name, and directory. The program then needs to be compiled into the PROFOUNDUI library. The exit program should be written to allow any uploads that you want to use in your system. Then the properties for allowed type and size on the upload widget can be used to refine the selections on a screen by screen basis. If your exit program is not set up to allow an upload you are attempting you will receive a message, when trying to upload, that says the upload was prevented by the Exit program.
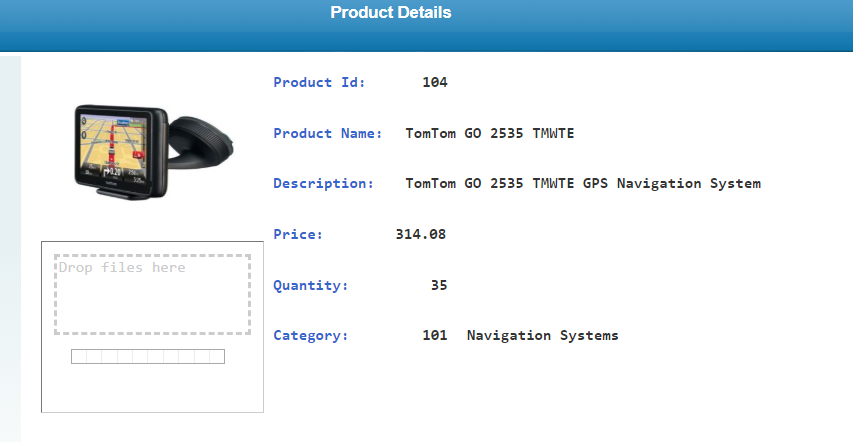
Finished Product
The Product Details page now contains an image with a drag and drop file upload widget that allows the image to be updated. This was all accomplished without making any changes to the Product Details program.
Thanks for reading this issue of Profound Pro Tips! Please comment below with any questions you might have, or if you have any ideas on the next topic, we should cover. You can also ask questions and find solutions on our Profound Logic Forum.
