Profound Pro Tips is a blog series focused on issues that our support team receives and questions our Profound Logic customers have. Don't see your question/concern in Profound Pro Tips? Please feel free to contact our team or leave us a comment below.
Today’s Topic: Using Your IBM i Tables with NodeRun
Last week we introduced NodeRun, which is a great tool for experimenting and designing applications with Node.js and Profound.js in a cloud environment. This environment is perfect for creating database-driven applications that you can share and collaborate on with others. To enable building these database-driven applications, the NodeRun environment is built with a MariaDB database already installed.
One of the biggest perks of NodeRun is the ability to build tables. Creating a space using one of the built-in templates will create a table that you can use in NodeRun's environment. These tables are pre-populated with example data that you can use in your application.
Drag and Drop From the Database Panel
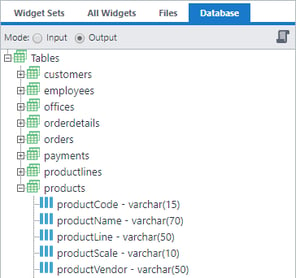
If you’re creating an application with a GUI you can simply drag field names from the Database panel onto the screen to create and bind elements to the database. Switching the Mode selector between Input and Output before dragging and dropping a field allows you to select whether the field is being used for input or output. Each field type has a default Widget Type that used for input or output, however, you can change the widget type and other properties for a field by right-clicking the field in the Database panel and selecting Properties.
Running SQL Commands
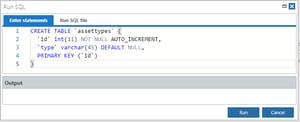 Clicking the Run SQL icon opens a Run SQL dialog that allows you to run any SQL statements you need. Right-clicking a table and selecting Query will open the SQL dialog pre-filled with a Select query for the table selected.
The Run SQL dialog can be used to run any SQL statements including creating new tables.
After running the statement, close the dialog and then right click on Tables and select Refresh to get the new table to display in the list.
Creating New Tables From IBM i Tables
If you are using NodeRun.com to try out some Profound.js ideas that you plan to use with tables on your IBM i you will want to use the same table names and field names in your NodeRun application. Since you cannot connect to your IBM i database from NodeRun.com you will need to recreate the tables that you will be working with. Fortunately, there is a pretty easy way to do this.
The first thing you need to do is generate a SQL script to create the tables. In IBM i Access Client Solutions, under Database, click on the Schemas link. This will open a Schema view window.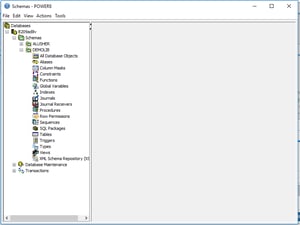
If the Schema (library) that you need is not in the list add it by Right Clicking Schemas and selecting Include…. Enter the Schema name and click Add, then OK. Collapse the Schemas and Reopen to reload the list.
Now that the list includes the appropriate Schema, expand it and select the Tables items to open the Tables view in the right panel.
Right-click on a table or use Ctrl + Left Click to select multiple tables and then right click one of the selected tables.
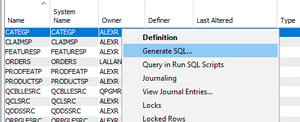 From the context menu select the Generate SQL option.
This will open a new Dialog with the selected tables listed. You can Add or Remove tables using the buttons on the right.
On the bottom of the dialog are three tabs: Output, Options, and Format. The Output tab defaults to ‘Open in Run SQL Scripts’. You could change this to write to file directly, but I keep it on Run SQL Scripts in case I need to make any adjustments to the script before saving.
The Options tab defaults to the Options you would want for recreating the table on the IBM i. You will want to un-check several options for transferring to NodeRun.com.
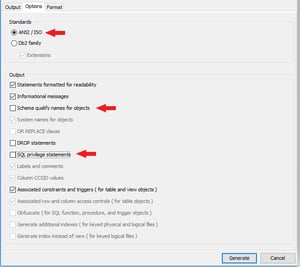 First select the ANSI/ISO option in the Standards group. Switching this option will turn off several of the Output options.
Un-check Schema qualify names for objects and SQL privilege statements.
By changing these options before generating the SQL statements you will save time on editing the statements afterward. However, by opening the statements in Run SQL Scripts you will still have the opportunity to adjust the statements as needed before saving.
Click Generate to build the SQL statements for creating the selected tables.
Run SQL Scripts will open with one or more Create Table statements. Make any additional adjustments that you need in the SQL editor. You can then either select all the statements and copy them or you can click the Save icon to save the scripts to a script file.
Back at NodeRun.com click on the Run SQL icon at the top right of the Database Panel to open the Run SQL dialog. If you copied the statements, paste them into the textbox on the Enter Statements tab. If you saved the statements to a script file, switch to the Run SQL file tab of the Run SQL dialog. Click choose file and then browse to and select your .sql file.
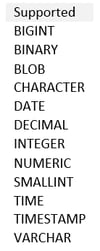
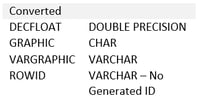
After clicking Run, there will be a brief delay and an Executing indicator will be displayed. If the output window displays errors, you will need to make some adjustments to your created statements. This will happen if there is something in the statement that is not compatible with MariaDB. While most basic DB2 field types are supported or will be automatically converted by the Generate SQL command, there are a few that will not work with MariaDB and will need to be removed or manually changed to another type.
DATE field CURRENT_DATE default
While DATE fields are supported the CURRENT_DATE keyword is not supported as a default value for a date field in MariaDB. CURRENT_TIMESTAMP, however, is supported as a default value for the TIMESTAMP field. You can either remove the default value for the DATE field and set the date in the insert statement or change the DATE field to a TIMESTAMP and use the CURRENT_TIMESTAMP value.
When the output window does not list any errors after running the script, your table or tables have been created. Close the dialog, right-click on Tables, and select refresh to refresh the list of tables.
You have now created versions of your IBM i tables in NodeRun.js that you can use when creating and testing your code! This will make it much easier for you to utilize all of NodeRun's features in the environment you are used to working in.
You can sign up for NodeRun for free and begin working on your tables today!


